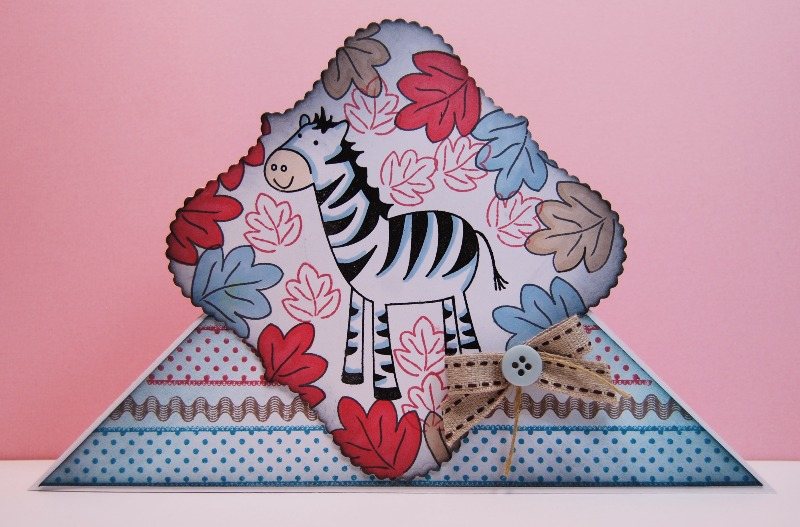
www.inkydoodles.co.uk, site logo.
Follow us on Facebook

find us on facebook

All major debit / credit cards accepted (via Paypal secure website), or by your PayPal Account.

New side column

Cheque payments also accepted.

  • PayPal
  • Mastercard
  • Maestro
  • Visa
  • Visa Electron
Powered By Paypal
Mailing List

Subscribe to our mailing list

* indicates required

Shopping Basket

You currently have no items in your basket.

Shop Search

Blog

Hi, Sarah here.

I want to use the blog to let you know about what's going on at Inky Doodles, in my head and in the wider world of stamping and papercraft so that you too can be inspired and create something amazing!

find us on facebook


With the help of the wonderful Caroline Shinnie I hope to be able to show a card or project with instructions most days.

 RSS Feed

  1.  
    Stamps Used
     
     
    Inkpads Used
     
     
    Other Items used
    6x6 Card blank
    Promarkers - Ruby, Denim Blue, Tan
    Clear embossing powder
    Ribbon, String, Button & Square Die Cut
     
    To make the basic triangular card shape, cut a 6x6 card blank in half, diagonally. Use the excess piece to make the background paper by trimming slightly. Stamp the background paper using the ribbon and ric-rac stamps from the Bloom and Grow set in Teal Zeal, Cocoa & Rhubarb Stalk. Ink the edges with Teal Zeal using an ink duster brush for a soft, subtle effect and then attach to the card base.
     
    For the topper, stamp the Zebra in black Versafine and emboss with Clear Embossing Powder, cut out with a die of your choice. Stamp the leaves around the zebra and colour in using Promarkers. Ink the edges with Teal Zeal and Black Memento. Stick to the centre of the card and add a simple bow and button in coordinating colours to finish off.


  2.    
     
    Stamps Used
     
     
    Inkpads Used
     
     
    Other Items Used
     
    Gold embossing powder, Blue & Pink Acrylic paint, Twine, Buttons, Metal Embellishments, Blush Guilding Wax, Frantage aged Aqua embossing enamel. Tag MDF, Heart MDF 
     

    Firstly paint the MDF shapes, the tag in blue, and the Heart in pink. When dry, use the blue acrylic paint on the medieval stamp, and stamp randomly onto the pink heart. Stamp the Heart & the Sentiment in Versamark Ink and emboss with gold onto each of the shapes. On the top of the tag shape, swipe the clear Versamark ink and add the Frantage heat emboss. Then add blush guilding wax onto the front and back of the tag. Punch three holes into the bottom of the tag, using a cropadile. Hang with Twine, the metal embellishments and secure using Buttons. 

  3.  
    Stamps Used


    Inkpads Used
     
    Distress Ink - Pumice Stone & Rusty Hinge
     
    Other Items
    Promarkers - Blossom, Coral & Ginger.
    Kraft card
    String

    To make the background, stamp the Medieval in Pumice Stone Distress ink, cut it out and distress the edges with Rusty Hinge, attach to the left hand side of the card blank. For the tag, stamp the Cat and the Mice in Black Memento, colour in with Promarkers, then randomly stamp the fish bones  around the edge using the Pumice Stone ink pad. To finish off the tag, edge it using a Ginger Promarker and add ribbon loops to the bottom (using extra sticky double sided tape on the back), and a bow at the top. Thread three buttons onto the the string and tie it around the card, when you're happy with the position of the buttons you could stick them down. Stamp "Happy Birthday" from the Tags & Textures set  in Rusty Hinge, cut it out and edge with the same ink pad, then attach it to the card with a Wooden Peg.